Runeseeker is the sort of Path of Exile 2 quest that looks harmless when you first bump into it, then quietly follows you for the whole campaign. You meet Farrow in Clearfell after a fight near a Kalguuran Runic Remnant, and he gives you the basic rundown on Runic Remnants, crafting, and the odd bits of old magic tied to them. If you're already sorting gear, checking upgrades, or saving PoE 2 Currency for later trades, it's easy to click through his dialogue and move on. Don't do that. This quest rewards steady attention, not speed, and missing a step can send you back through zones you'd rather be done with.
How the Runeseeker quest works
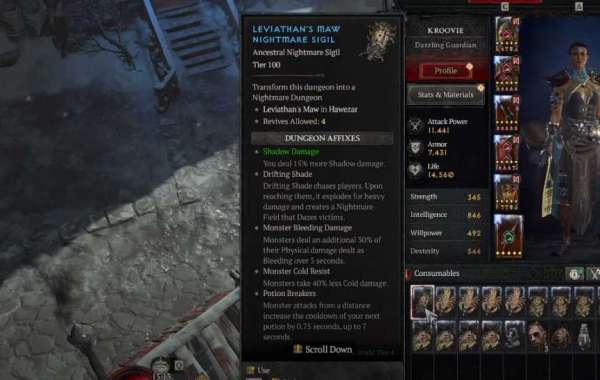
The loop is simple enough. In each major part of the campaign, Farrow wants you to find Runestones, which are usually large rune-marked objects sticking out of the ground. Once you've found the required ones in that Act, the related Runic Vault appears on your region map. Then you enter the vault, clear what needs clearing, and learn a little more about the rune magic Farrow is chasing. The annoying bit is that Path of Exile 2 maps are randomised, so nobody can give you a perfect "turn left at the tree" route. You'll need to sweep the right zones yourself and keep an eye on the map markers.
Act 1 through Act 3 vault steps
After Clearfell, your first real job is to search Ogham in Act 1 for the required Runestones. When you've found them all, the Runic Vault in the Lost Catacombs becomes available. Head inside and deal with the encounter before moving on. In Act 2, the same pattern comes back. Search the relevant areas for Runestones, then enter the Skull of the Titan Runic Vault once the map reveals it. Act 3 sends you hunting again, this time leading toward the Mystic Refuge Runic Vault. It can feel repetitive, sure, but checking each region map before leaving an Act saves a lot of irritation later.
Act 4 treasure map pieces
Act 4 changes the rhythm a bit. Instead of only hunting Runestones, you need four torn treasure map pieces across the Karui archipelago. Look for special corpses in Kedge Bay, Shrike Island, Whakapanu Island, and the Isle of Kin. Interact with each corpse to collect its piece. Once you've got all four, take them to Makoru in Kingsmarch. Not Dannig. Plenty of players make that mistake because Expedition content points your brain in his direction, but Makoru is the one who reveals Plunder Point on the sea map.
Clearing Plunder Point and finishing the route
When Plunder Point is unlocked, sail there and complete the Expedition encounter by placing explosives around the island, then detonating them to open the way forward. This leads to the Deserted Post Runic Vault, which wraps up the campaign-long chain. Before you push into later content, it's worth doing a quick pass over your region maps to make sure no Runestone step is still sitting unfinished. If you're planning a smoother character setup afterward, you may also want to buy cheap PoE 2 Currency while sorting your gear, since a cleaner build makes backtracking and vault clears much less of a chore.